

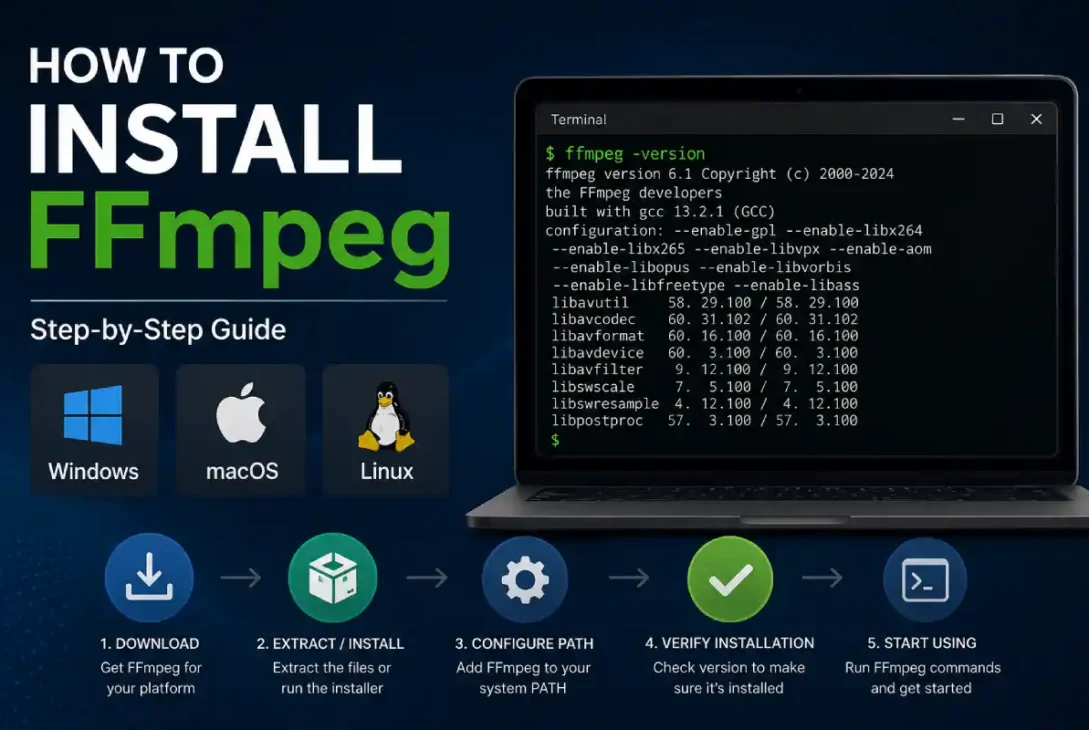
If you deal with video or audio, screen recordings, podcasts, or do media conversion, then chances are that you already know FFmpeg. For all that we know, it’s among the best free open-source multimedia frameworks available at present. Unlike common media editing apps whose interfaces rely on extensive arrays of buttons and menus, it’s command-based, allowing very granular control over your audio and video content.
The better news is that installing FFmpeg is far less complicated than you might imagine. The specifics obviously vary based on your operating system (OS). But once installed, this tool will let you manipulate all your media files – convert file formats, extract audio from videos, compress large files, and much more. In this post, we’ll cover installing FFmpeg on Windows, macOS, and Linux, verifying that it works, and fixing the “ffmpeg command not found” error.
What Is FFmpeg?
FFmpeg is a portable and robust open-source solution to convert, stream and record any media. Whether you use any operating system (Windows, Mac, Linux), this software solution can help you perform audio and video tasks easily. Features: Can record, play, convert and stream anytime, 24×7.
FFmpeg also supports an almost unlimited range of inputs and outputs, from raw video to DVDs.
FFmpeg helps you to convert your MP4 files to AVI format or vice versa. If you would like to combine audio and video into a single output, you may have to take care of the trickiest aspect: integrating two separate media parts together and thus make your favourite video of your own choice.
FFmpeg vs. a Regular Media Converter
Media Converters Offer Limited Choices. Typical media converters often allow only a handful of presets like “MP4”, “MP3”, “HD Video”.FFmpeg offers immense flexibility. You have access to options like codecs, bitrates, resolutions, frame rates, audio settings, filters, subtitles, stream control, and many more. This is exactly why FFmpeg is popular among many developers, producers, and even software development suites.
FFmpeg Installation at a Glance
| Operating System | Recommended Approach | Difficulty | Best For |
| Windows | Download a compiled Windows build | Easy | Beginners and desktop users |
| macOS | Install through Homebrew | Easy | Mac users who prefer Terminal |
| Ubuntu/Debian | Use the package manager | Very easy | Most Linux users |
| Linux from source | Configure, compile, and install | Advanced | Developers and custom builds |
You can download the Windows, macOS, and Linux builds of FFmpeg from the official FFmpeg website, as well as its source code if you wish to compile FFmpeg yourself.
How to Install FFmpeg on Windows
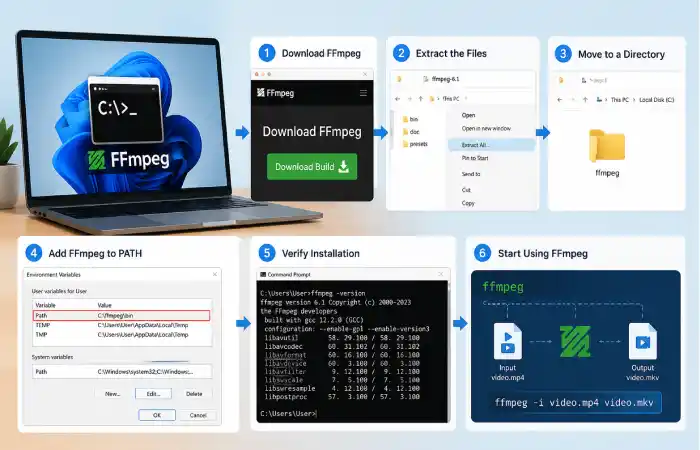
Generally, on Windows, most users download ready-built FFmpeg instead of building it from source. The official FFmpeg download page redirects Windows users to builds by a third party such as gyan.dev, BtbN, etc. Because FFmpeg mostly only gives out its source code.
Step 1: Open the FFmpeg Download Page
Head over to the official FFmpeg download page:
Under the Windows tab, select a Windows build of FFmpeg.
It’s highly recommended not to download FFmpeg from just any website. Since FFmpeg is an extremely popular tool, many download pages can be a little overwhelming or come packed with programs you do not necessarily want or need.
Step 2: Download a Windows Build
Select a recent Windows version applicable to your machine.
Extract the archives using the Windows integrated extractor or another safe extractor tool of your choice when downloaded. You should find a fold which should contain: bin, doc, include, lib. The bin folder should be where the executable files can be found.
Step 3: Place the FFmpeg Folder Somewhere Convenient
One typical location is:
C:\ffmpeg
The directory could contain:
C:\ffmpeg\bin
The location of the folders depends on the build you downloaded.
Step 4: Add FFmpeg to the Windows PATH
This is one of the most important parts of the installation.
The PATH environment variable tells Windows where to look when you type a command into Command Prompt or PowerShell.
If you add the FFmpeg bin directory to PATH, you can type:
ffmpeg
from almost any directory instead of entering the complete path to the executable.
To add it:
- Open the Windows search box.
- Search for Environment Variables.
- Select Edit the system environment variables.
- Open Environment Variables.
- Locate the Path variable.
- Choose Edit.
- Add the path to your FFmpeg bin directory.
- Save the changes.
For example:
C:\ffmpeg\bin
Close and reopen Command Prompt after changing PATH.
Step 5: Verify the Installation
Or open Command Prompt or PowerShell and type:
ffmpeg -version
This will show the FFmpeg build. If everything is set up correctly, you should be presented with FFmpeg version and build info.
As of August 2026, FFmpeg 9.0.1 ( released Aug 12, 2026) is the newest stable FFmpeg release listed on the project’s webpage.
You may have a different version if you downloaded another build or an outdated package.
How to Install FFmpeg on macOS
There are many ways to install it on Mac, but Homebrew is often one of the easiest solutions as long as you are at least willing to be in Terminal.
If Homebrew is already installed, it’s actually as simple as this:
First, open your Terminal and run:
brew install ffmpeg
Homebrew will then download, along with any necessary package dependencies, and install ffmpeg.
You can verify that it was installed:
ffmpeg -version
If FFmpeg version information prints, then you succeeded!
What If Homebrew Is Not Installed?
Download and install Homebrew first if you don’t have it already (refer to the Homebrew installation instructions). Back in Terminal, execute the following:
brew install ffmpeg
This is a simpler method than compiling FFmpeg, and it’ll help us install by many processes using it.
The FFmpeg project offers a download for macOS on its download page too.
How to Install FFmpeg on Ubuntu or Debian Linux
If you are using Linux, you are in luck. Usually FFmpeg is available via regular repositories, so it should be very easy for you.
Open Terminal on your Ubuntu (or Debian) based distribution and execute:
sudo apt update
Then FFmpeg:
sudo apt install ffmpeg
After the package is installed, just verify it by typing:
ffmpeg -version
If you get the command with its version numbers, then FFmpeg can be used from now on.
Please note that the FFmpeg available through your distribution may not be the latest from the FFmpeg project. Nothing bad, though. Sometimes Linux distros put their own versions in repos for compatibility reasons.
Why Use the Package Manager?
That’s where system package managers like apt on Ubuntu or MacPorts/Homebrew on macOS come in handy. It will do all the work for you: the dependencies, and installing and integrating the package into your system. In many cases, just a pair of commands. The alternatives often involve downloading, decompressing, moving files to different directories, and setting some environment variables.
Installing FFmpeg on Other Linux Distributions
The approach is similar for other distributions (you might use other package managers like Pacman on Arch, have other FFmpeg packages available, or check third-party repositories for your specific distro). On the FFmpeg website download page, you can find some ready-made Linux builds (both binary-only packages and some static builds that do not depend on other libraries installed on your system).
How to Install FFmpeg From Source
Building FFmpeg from scratch is quite unlike simply installing an existing package. It really only makes sense for yourself if you are a developer, an experienced Linux user, packaging the software yourself, or if you require a special version. The FFmpeg compilation guide lists the “standard” configure-make process: ./configure, make, make install. That “configure” process “prepares” the compilation based on your chosen option selections.
Make “build” it. “make install” puts the compiled bits and bobs where they belong.
Download the official released versions from the FFmpeg Site and use any of the source control (git) clients to access Development versions.
Why Would Someone Compile FFmpeg?
The benefit of a custom build is the ability to choose specific libraries/codecs/hardware accelerators/config settings.
However, building from the source will always include added complexity; you’ll need to install a compiler, build tools, development libraries and any other dependencies. A custom build is rarely a sensible choice for an ‘everyday’ user who just wants to convert a video or rip audio.
How to Check Whether FFmpeg Is Installed Correctly
Once installed, the easiest test to run is:
ffmpeg -version
The easiest test would be ffmpeg -version.
You could also get FFmpeg to list its compilation flags and configuration details.
Ffmpeg -buildconf
This would also prove the FFmpeg executable is in the path
Another beneficial and widely used command is:
ffmpeg -formats
This would list supported formats in your build.
And the available codecs are:
ffmpeg -codecs
Either of these can be very handy during troubleshooting any conversion.
What to Do If “FFmpeg Is Not Recognized” Appears
One of the most common Windows installation problems looks similar to:
‘ffmpeg’ is not recognized as an internal or external command
This usually means Windows cannot find the FFmpeg executable through the current PATH.
First, make sure you add the bin directory, not simply the main FFmpeg folder.
For example, if the executable is located at:
C:\ffmpeg\bin\ffmpeg.exe
the PATH entry should normally point to:
C:\ffmpeg\bin
After changing PATH, completely close and reopen Command Prompt or PowerShell.
You can then try:
ffmpeg -version
If it still does not work, check the folder manually and make sure ffmpeg.exe actually exists.
How to Run Your First FFmpeg Command
Once FFmpeg is installed, you can try a simple conversion.
Suppose you have a video called:
video.mp4
You can convert it to another container format with:
ffmpeg -i video.mp4 video.mkv
FFmpeg will read the input file and create the requested output file.
You can also extract audio from a video. For example:
ffmpeg -i video.mp4 audio.mp3
For a basic audio extraction command, the exact encoding options may need to be adjusted depending on the desired quality and compatibility.
The important thing to understand is that FFmpeg follows a command-line structure built around inputs, options, and outputs. Its documentation describes -i as the option for specifying input, while output files are specified at the end of the command.
FFmpeg Installation vs. FFmpeg Compilation
| Feature | Prebuilt Installation | Source Compilation |
| Setup time | Short | Longer |
| Technical knowledge | Low | High |
| Customization | Limited by build | Extensive |
| Best for | Everyday users | Developers and advanced users |
| Dependency management | Usually handled automatically | Often manual |
| Maintenance | Easier | More involved |
For most people, the answer is simple: install a prebuilt version first.
There is little advantage in compiling FFmpeg yourself if your only goal is to convert videos, extract audio, resize media, or perform ordinary multimedia tasks.
Common Mistakes to Avoid
Installing FFmpeg is usually straightforward, but a few small mistakes can cause unnecessary frustration.
Downloading From an Unknown Website
Use the official FFmpeg download page as your starting point. The project specifically lists where users can obtain compiled builds for different platforms.
Forgetting the PATH
On Windows, downloading and extracting FFmpeg is not always enough. If you want to call ffmpeg from any folder, the executable’s directory needs to be available through PATH.
Installing Multiple Versions
Having several FFmpeg versions scattered across your computer can make troubleshooting confusing. If the wrong executable is being used, the version displayed in Terminal or Command Prompt may not be the version you expected.
Copying Commands Without Understanding the Input and Output
FFmpeg commands can look intimidating, but the basic structure is logical.
For example:
ffmpeg -i input.mp4 output.mp4
Here, input.mp4 is the source and output.mp4 is the destination.
Once you understand that pattern, more advanced commands become much easier to read.
Is FFmpeg Free to Install?
FFmpeg is a free and open-source multimedia framework. A portion of our sources is distributed between the source releases (which usually also include all of the dependencies), as well as providing instructions on how to get pre-packaged versions of FFmpeg. Note that different parties doing the third-party-built version may be packaging their own set of libs, or following alternative procedures.
If you plan to integrate FFmpeg into a proprietary (commercial) application, please read the license page and the license of any selected third-party-built version for the licenses of the libs.
Final Thoughts
Thankfully, once you learn to start with a clean installation of FFmpeg – although this might sound intimidating at first – it is not too much of a chore. On Windows, you would generally want to grab a pre-compiled build – you just have to extract that and add the bin folder to your system’s PATH environment variable. If you are running a Mac, you should have no problems installing it using a package manager like Homebrew, and the package manager present in your system on Linux(apt for Ubuntu and other Debian-like distros should have it in its repositories.
Also Read: https://www.nextleveltechie.com

 Welcome To Next Level Techie, For any queries you can contact us at :